Showing posts with label Wedding. Show all posts

Wednesday, October 5, 2011

Welcome to my musings...

Hello all!  It has been almost three months since I last posted and that just won't do.  Welcome back and get ready for a transformation of the blog and what I write muse about.  When I started this blog I did want it to be an opportunity for me to share my wedding journing with people that could not be here in person for my crafting and planning, but I had always hoped to keep it up afterward and just share how things are going in our new home, the lessons I am learning as a Mrs., and other musings that I feel the need to share.  So... here is the blog with a new purpose and a new name but still the same girl behind the writing :)

We had a beautiful wedding!  After five short months of planning I had a wedding that I was not expecting, but that I truly cherish.  We are so blessed to have such amazing friends and family that helped to make the day special and were there to celebrate with us as we embarked on the amazing journey of being husband and wife :)


It was a beautiful rainy day that filled my heart with joy and has given me so many wonderful memories :)

My future posts will probably contain more recaps of our wedding, the honeymoon, and what has been going on in our lives since the wedding, but for now the photos will have to do.

Thursday, July 7, 2011

Cute As a Button

Hello all!  Hope you are having a fantastic Thursday!  The weekend is almost here :)

This morning I had a dress fitting, and it got me in the mood to run some wedding errands :) (although I must say that it doesn't take much to get me in the mood for wedding stuff!)

One project that I focused on in my shopping was picking up supplies for my flower girl's headband.  I found a two pack of white silk headbands at hobby lobby, and a package of wedding buttons at JoAnn's and I was set!

Here is what I came up with:


I just made three small fabric flowers like I used on the flower girl basket and the bridesmaid dresses, and added fun buttons to the center flower :)

Here is a close up of the buttons (they happen to be my favorite detail):


I am hoping to post a lot of the wedding crafts that I have been furiously working on before I leave for training on Sunday... if not you will get random sporadic updates of wedding crafts that have been done for a few weeks :)

Sunday, July 3, 2011

Bridal Bouquet

I swore I would never create my own bridal bouquet.  It scared me, I tought I would disappoint myself and hate it forever, I did not know where to even start.  Then reality set in and I swallowed my fear and jumped into the project (with the help of my lovely friend Jenna... I think she was the real courage booster!)

So now I am here to share with you our adventure of making my bridal bouquet :)  But as usual, I am first going to show you some inspiration pictures from around the web:


Once I had found enough pictures to serve as inspiration, Jenna and I set off to find silk flowers.  The first stop was a great store here in Springfield called Martin's Floral and Home Decor.  They have the best deals in town for silk flowers, and a huge selection to choose from.  I found almost everything I needed there, but we did make one stop at Hobby Lobby to round out the flower needs :)  Here is what we ended up with:

*One Dozen Roses
*7 Calla Lilies
*3 Ranunculus
*2 Hydrangeas

When we got home we separated all of the flowers into single stems, and cleaned up any leaves or other pieces that we didn't like.  Then we chose which flower we wanted to be in the center, and added flowers around it until the entire bouquet was made.  I wanted a bouquet that did not have a set order (such as one flower type in the center surrounded by a different flower type on the outside) so we really paid attention to not have too much of one type of flower in a given area.


Cameron snapped a picture of us while arranging :)  I just love this girl!


Once we had added all of the flowers we moved them around until we came up with an arrangement we liked, and here is the final producut:


Here is Jenna posing with the finished bouquet :)


We wrapped the stems in pewter ribbon just like the bridesmaid bouquets, but I wanted to add something a little different to make it look like a bridal bouquet.  I found this picture while perusing the internet and decided that I wanted to add som lace :)


I wanted the lace, but I still wanted the pewter to show, so I cut the lace in half to make it skinny and then wrapped it around the stems, leaving space so that the pewter ribbon could show through.


The final part of the project was to add a sentimental touch, inspired by this picture:


In the upper right corner of this collage is a picture of a little silver sillouette.  My great grandmother had a pin that she wore all of the time that had little gold hearts or sillouettes for all of her children, grandchildren, great grandchildren, and great great grandchildren (there are A LOT of little gold hearts and sillouettes on this pin!).  She passed away in October, but I wanted a way to have her part of the wedding as well as my little brother Bennett who passed away, so I asked for my heart and Bennett's heart to sew on to my bouquet.  I also sewed on each of our "little people" charms that my mom wore on a necklace.


My bouquet is beautiful and sentimental, and I cannot wait to walk down the aisle with it!


I also want to wish my future brother-in-law Carter a very happy birthday!  Can't wait to spend the day with you :)

Tuesday, June 28, 2011

45 Days!!!

Today I had a minor freak out.  I leave for training in a week and a half, and I have a wedding to-do list at a page and a half and growing, and we only have 45 days until our wedding!!!!!!  With so much to accomplish, Cameron and I were on a war path this afternoon.

Our wedding invitations finally got sent out!  Check off the list :)

We next moved on to the many wedding craft projects that I still need to finish, and I am going to share one of them with you tonight, but first here is a cute picture of Cameron working to finish some items off of the wedding list:


I have seen so many cute ideas of how to make the guest "book" unique, and my favorite idea is a wedding tree where guest "leaf" their thumb print and sign it.  By the end of everyone signing the tree and leaving their thumb print the bride and groom are left with a beautiful piece of art to remember their special day.  Here are some cute pictures I found on the internet showing the wedding tree guest book:


And now for our wedding tree.

I started with acrylic paint in pewter gray and a basic 16x20 canvas.


I sketched out a tree design that I liked first with pencil and then went over it with the pewter paint.


Here is what the tree looked like after I finished painting it:


Then I added our names and our wedding date in the empty space at the bottom and I was finished!


When we were out picking up supplies for wedding crafts we found a great deal on ink pads and were able to pick up six pads in varying shades of yellow and gray for just a dollar a piece!  I cannot wait to hang our wedding tree in our bedroom as a forever reminder of our special day :)

Wednesday, June 22, 2011

Hey There Good Lookin'

I am so thankful for amazing friends!  I leave for training in two and a half weeks (ahhhh!!!!) and there is still so much to be accomplished for the wedding.  Tonight my lovely friend Mina came over to help me with wedding crafts and catch up :)  It was great to get so much accomplished as well as catch up with a good friend :)  I just love her!

When we started the night she worked to finish up the bridesmaid bouquets that I still had to finish, and I worked on sewing more fabric flowers (they are the death of me!  easy but take so much time).  When she finished with the bridesmaid bouquets that I had on hand we were at a crossroads of going to buy the items necessary to finish the bouquets and make the boutennaires or sew some more... we chose to go buy flowers!!!

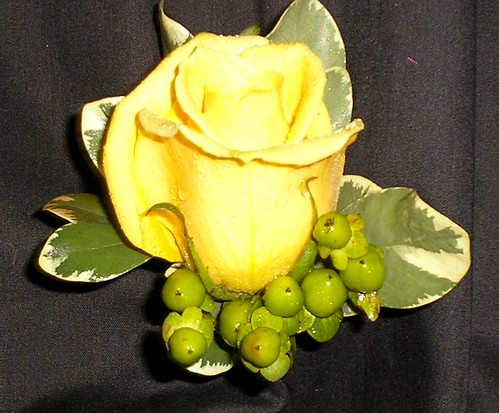
I had already picked up a bouquet of small yellow roses to match the bridesmaids bouquets, but I just wasn't sure how I wanted to use them.  Here are a few ideas that I was working off of from around the internet:


Diana & Iman's Urban Rooftop Wedding

Okay enough of the examples... it's time for me to show you what we came up with!

First here is an adorable picture of Mina excited to work on boutennaires :) (sorry for the blurriness)


And a lovely picture of the mess of fabric flowers strewn all over my living room :)


And here is what we created!


I am so happy with the final product!!!!  It is pretty, delicate, vintage yet contemporary at the same time.  Everything I was hoping to create!


Here is Mina wrapping the stems with the pewter ribbon (to match the bridesmaid bouquets).  And please take a moment to look at her rock!  Absolutely gorgeous!


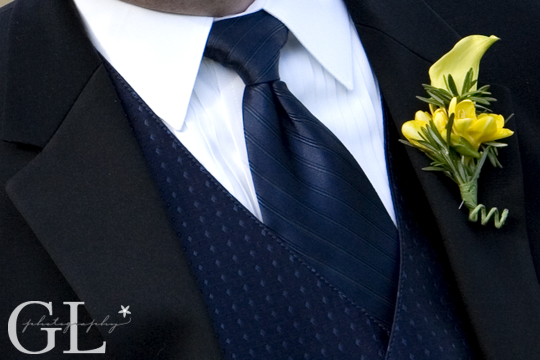
And here is a picture of Cameron's boutennaire.  I wanted his to be slightly different and match my bouquet, so I added a calla lilly.


I was really intimidated to start this project, but I am so glad that I took the plunge.  They turned out exactly how I wanted them to and I saved so much money by doing them myself.  I got the best of both worlds: cost effective and perfection :)  This is a happy bride!

Followers