Sunday, May 29, 2011

And the wedding planning continues...

Wow.  What a week it has been.  Last Sunday life for many in Joplin, MO was turned upside down by a terrible act of nature, and this past week has changed how I look at a lot of things.  I have been able to witness kindness and generosity that I did not know existed, and I have also observed a town filled with so much love and dedication to one another to continue moving forward.  I am so proud to be able to have our wedding in such an amazing town, and I hope that I can show them even an ounce of kindness that I have witnessed them all sharing with each other this week.

Even in all of the chaos of this week, wedding planning must go on.  I wanted to share another one of my wedding DIY projects with you.  This one involves making the silverware bundles for dinner.  Because our wedding is outside I knew that I wanted disposable napkins and silverware, but I still wanted them to look nice and fit with our theme.  We bought the plastic silverware that looks like metal to achieve a nice look.


We got really lucky and found the heavy napkins that I wanted with gray flowers along the bottom!  Vanity Fair was thinking about my wedding theme when they made them ;)


All we did to assemble them was roll the silverware in the napkin and secure with yellow curling ribbon.


I am really happy with the finished product, and I think they carry the theme really well :)

Monday, May 23, 2011

Creating our wedding bounce

Last summer mom and I experimented with making cherry bounce and it was an experiment that turned out very yummy!  When Cameron and I were deciding how to handle alcoholic drinks at our wedding we decided to go with a few signature cocktails and fruit bounce is one of the cocktails that we will be serving.

For the wedding we made blackberry and blueberry bounce, and the process is really easy.  The recipe we used called for 4 quarts vodka (or any hard alcohol you want to use) mixed with 2 1/2 cups sugar.


You then pour the vodka sugar mixture into court sized jars filled 3/4 of the way full with fruit.  We chose to use frozen fruit becuase of the ease as well as affordability.


Once the lids are on you just let the bounce sit for about three months.  The first couple of weeks you need to turn the jars over every day to mix up the mixture, but then the work is done!  To serve you just mix a quart of bounce with about a liter of citrus soda.  I hope that all of our wedding guests enjoy this yummy treat at our wedding

On a separate note please play for everyone in Joplin.  Our family and friends are ok, but some of their houses were destroyed in the storm, and many in Joplin were not as lucky.  Keep everyone in your thoughts and prayers, and look for ways to help those in the community.

Sunday, May 22, 2011

Shoes, shoes, shoes

I found my bridal shoes!  I have been looking around for a while to find the perfect pair that was less than 2 and a half inches high (because Cameron is short) and did not have luck until I got to Marquette!  Go figure :)

I found them at White Gown Black Dress located in downtown Marquette.  The ladies were so sweet and attentive!  I highly recommend going in there :)  They are part of the Touch Up by Benjamin Walk line and they are the perfect shoes for the day!


I am so happy that one more piece of the wedding puzzle is complete :)  On a separate note I got the job and am moving into our townhouse next week in preparation for my month of home study!  Thank you to all of you who prayed and sent positive thoughts my way.  This opportunity is a huge blessing to Cameron and I and I am so excited to get started!

Wednesday, May 18, 2011

Shopping... in my mom's house

Good Morning!  The past two day have been wonderful.  It feels so good to be back home in the U.P.!  Cameron and I played board games, went for a walk in the woods with my mom, and shopped for fun bridal shower things.  I also got to spend time with my matron of honor and one of our closest friends from high school.  So great!

The nice thing about coming home is that mom is letting Cameron and I shop her house for lack of a better explanation!  We knew that we were picking up certain pieces of furniture this trip, but she is letting us take a lot of really neat stuff back, and the most exciting part is that a lot of it has sentimental value to me because they are family heirlooms.  I thought that I would share some of the fun stuff coming home with us to give you an idea of what will be making our new townhouse a home for the two of us :)

Below is the china that I am taking home.  Cameron and I did not register for china, because we did not feel that it fit into our lifestyle.  I was really excited to learn from my mom that she had my great great grandmother's china, and that I could use it in our new home!


We are also taking home a bedroom set that was in my great grandparent's house.  I have loved this bedroom set since I was little and I am really excited to use it in Cameron and I's bedroom :)


Continuing with the family heirloom's I am going to be using my great grandmother's desk in our new house.  It is absolutely beautiful and will be a great addition as well as have a very personal connection to me.


You would think that the kindness would stop there, but no!  Mom is letting us have the living room set in our basement and I am beyond excited to curl up in the oversized chair!!!!


Cameron and I are so blessed to have come from such great families that want the best for us and our new life together!  Thank you mom for helping us furnish our home!

My first bridal shower is tonight and I am SOOOOOO excited to see everyone and have fun playing silly bridal shower games!  I promise to post a full recap soon :)

Sunday, May 15, 2011

I'm a Big Girl Now!

Today is my 22nd birthday!!!


22 feels so old!  There are no more exciting birthdays to look forward to :(  Minus when I turn 25 and my insurance goes down again.

Today we finished up our car trip from Springfield to Marquette.  Not the most exciting way to spend a birthday, but at least I got to hang out with my favorite guy for the day :)

To top off turning 22, this weekend I also graduated from college!!!


It was such a wonderful weekend filled with family and friends :)  Thank you to all who came to celebrate with me!  It meant so much!

I am a master sander

I know that I promised a great post for today, but the weekend did not go as planned.  This post will be a random recap of my newest adventure into DIY projects :)

Last Saturday I went out with my friends Laura and Keith to the city wide garage sales taking place in Nixa.  I found a few things to add to the wedding, but was not able to find any of the big pieces of furniture I was on the hunt for.  I was hoping to find a credenza to refinish for our living room, but I guess it wasn't meant to be.

Saturday night Laura and Keith came over with Laura's husband Dave, and we had a nice bbq and sanding party!  Laura found some great deals at the garage sale, and she wanted to start sanding down her new barstools to get prepped for painting.  Luckily I had a sanding project that I was working on and we turned the night into a sanding party.

About a week ago Cameron and I bought a hutch off of Craigslist for $20!


It needs a lot of work, but it is the perfect size to fit between the fridge and wall in our new townhouse.


The space between the fridge and the wall is 4'3" and the hutch is 3'9" wide.  Fits like a glove!  We really needed a hutch for added storage because the kitchen has very limited cabinet space.


I figure that we can showcase our new dishes and pretty canisters on the shelves and use the drawers and cabinets at the bottom to store larger items like crock-pots and tupperware.  


So at my sanding party I began with basic sandpaper and after three hours of esentially getting nowhere (there is a lot of grime and old paint on this puppy) I broke down and bought an electric sander :)

Black & Decker 1/4 Sheet Finisher Sander (Model# FS540)

This little guy was at Wal-Mart and he is my new best friend!  I was able to sand almost the whole hutch in a matter of an hour and it would have taken me a lot longer without him!

The hutch is well on its way to looking awesome in a pretty olive green like the hutch in the picture below.


Over the next couple of months I am sure that you will see a lot more furniture projects as I get stuff ready for our new townhouse!  Hope that you all don't mind :)

Friday, May 6, 2011

One Year + 99 Days

Yesterday was our one year anniversary and what a wonderful year it has been with my favorite guy!


Yesterday also marked the day that we entered double digits to our wedding!  Only 99 days left (well technically 98 because I am writing this a day late)!  I cannot believe that in a few short months I will be married to my best friend and become Mrs. Calef :)  


Also, for those of you in the Springfield area I am having my Springfield Bridal Shower on the 23rd of July.  Get ready for a princess tea party!  Think royal folks!


A fun dress and hat or fascinator :)  I cannot wait!  I would love it if someone came in a crazy one!
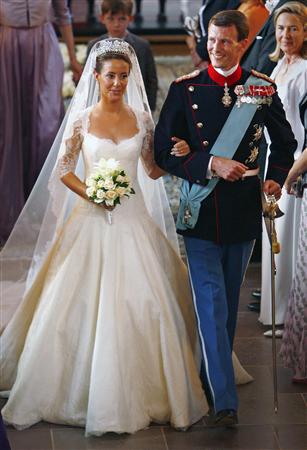

On a completely separate subject I think that I like Princess Marie of Denmark's dress over Princess Catherines :)

Princess Marie's royal wedding dress

Have a lovely Friday and I promise to have a good post for Monday!  Love you all!

Thursday, May 5, 2011

Milk Glass the DIY Way

As you all have seen I love milk glass and I want to use a lot of it in the wedding.  The only problem is that it can be a challenge to find inexpensive milk glass vases.  I have been picking them up whenever I find them, but I would like to have one milk glass vase per table at least and I am not quite there yet.

The solution to this problem came to me from a post by Emmaline Bride (have I mentioned how much I love that blog?!)  Since Cameron and I decided the look and feel to our wedding we have been collecting vases from thrift stores, but we have also been saving any glass bottles that we aquire from various liquids that we consume.  This has left us with a large collection of not-so-interesting glass bottles that need a face lift.  Mix an abundance of plain glass bottles with a need for more milk glass vases and you have a DIY project that makes me smile :)

First I started off with several plain glass vases and bottles.


The goal is to use white puff paint to create a design that helps the bottles to achieve the look of milk glass.  Here are some examples of milk glass vases that I have already collected for the wedding:


I went into the step of puff painting with the idea to have fun with the designs and not with the idea to completely recreate milk glass designs that I have seen.  This allowed me to have more fun and also not worry about being perfect.  


Here is what the plain glass vases looked like after the puff paint designs were applied:


Once the puff paint was completely dried, I moved on to spray painting the bottles.  I chose to use Krylon's indoor/outdoor paint in glossy white.  The back of the paint can stated that it was good for using with glass and I wanted the glossy finish so that the bottles had the smooth look of milk glass.


Spray painting was definitely an adventure.  The paint was quite runny which meant that we had to apply very thin coats.  We ended up doing around 4-5 coats to get the even coverage that we wanted.


Even though it was messy, the end product was well worth the work!  I am really happy with how the bottles turned out, and the bonus is that I have increased the amount of milk glass vases we have for the reception without spending extra money for pricey real milk glass :)  


This is one happy bride!

Followers